
Oracle Fusion Procure to Pay (P2P) Life Cycle with Setups and Process Flow
The Procure To Pay cycle is vital to an organization as in this process the organization buys and received goods or services from its vendors and makes necessary payments.
The key functionalities for different processes of the Procure-to-Pay cycle are:- In-built intelligence with business transactions--Role-based dashboards and work area for buyer, approver; presenting the statistical report, trend, spend analysis, personalized search capability
- Enhanced sourcing capabilities--Supplier analysis, visibility of supplier lead time and popularity across departments
- Supplier self-service-- Single log-on for suppliers providing complete visibility to their transactions and full invoicing capability
- Standardized processes -- to facilitate shared services model and centralized procurement function
- Smart Receipt capabilities-- Automatic receipt application engine, Over/Underpayment rules, Scored recommendations based on customer, transaction or exceptions, centralized approach for receipt processing, set up rules to match receipt to the specialist for manual intervention, and rules to mark the priority of the receipt based on attributes
- Payable dashboard--to collaborate with various participants, visibility of priority items and work volume, item tagging option for quick retrieval
- Invoice Work Area-- Invoice creation from scanned images, exception resolution, Invoice creation in a format based on real life physical invoice offering easy data entry and audit
- Integrated invoice image processing-- image attached with the invoice throughout invoice life-cycle
- Invoice indicators--Out of balance, status and hold, prepayment alert during entry
- Voucher matching -- with the receipt and PO in the same window
- Personalized view-- Excel-like capability to freeze columns, personalized search, full-screen view, export to excel
One of the best characteristics of the Oracle Fusion applications is that they can be fully integrated with traditional Oracle ERP solutions like PeopleSoft, Oracle EBS. So the existing Oracle customers can choose to implement module-wise and selective Fusion functions too.
With the in-built business intelligence capabilities and business benefits of cloud-based applications; Oracle Fusion financials and procurement definitely equip the finance and purchasing users to play a bigger role and add value in overall business achievements. 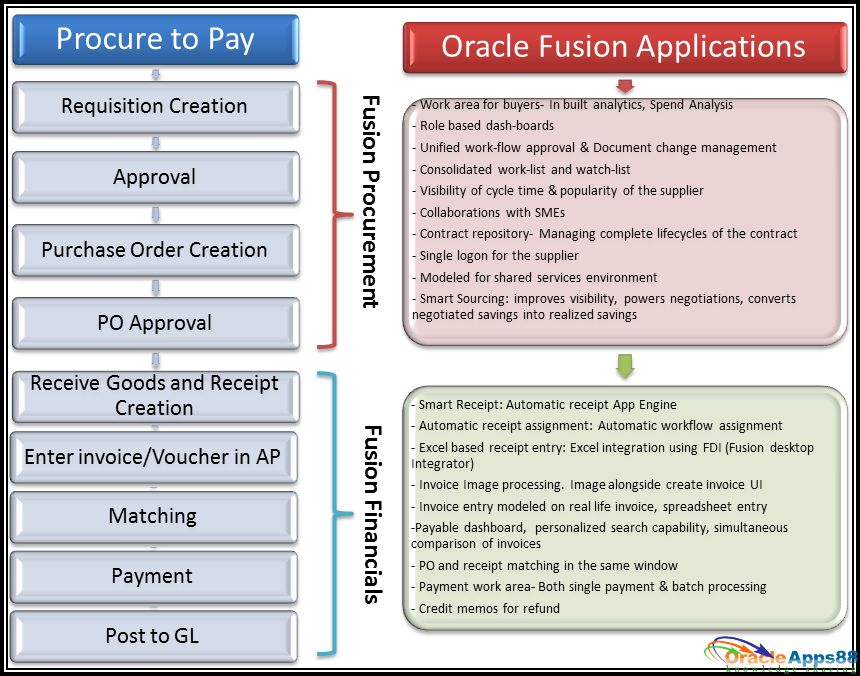
The P2P cycle comprises of the following steps,
Pre-requisite Setups:
4. Bank Account Setups
5. Payment Setups
6. Enabling the Non-catalog link in Requisition page
8. Approval Setups
9. Items
Process Flow:
Pre-requisite Setups:
Step 2. Buyer Setup
Enter the below values click on Save and Close buttonField Value Procurement BU US1 Business Unit Agent Apps, Oracle Default Requisitioning BU US1 Business Unit Manage Requisitions Full Manage Purchase Order Full Manage Purchase Agreements Full Manage Negotiations Full

a. Supplier : 1258 – United Parcel Service
b. Supplier Addresses:
c. Supplier Sites :
d. Supplier Contact:
Step 4. Bank Account Setups :
b. Bank Branch
c. Bank Account
Step 5. Payment Setups
Click on Browse Catalog
Expand the Shared Folder then Expand the Custom folder then Financials then click on Payments and click on the edit link in Disbursement Payment file Format
Path : Shared Folder/Custom/Financials/Payments/Disbursement Payment file Format
Click on the Add new Layout link
Click on the upload layout link
Enter the Layout name and select the RTF file and saveName Value Layout Name XXAA_CHECK_FORMAT Type RTF Template Locale English


Set the custom layout as default and Select the output types as PDF and XML and click on Save.
b. Creating Payment Format
Select Disbursement Payment File Formats and click on Create
Enter the details and click on Save and CloseName Value Name XXAA_CHECK_FORMAT Code XXAA_CHECK_FORMAT BI Publisher Template XXAA_CHECK_FORMAT (Created in Step1)

c. Creating Payment Document
Search with Manage Bank Accounts and click on Go To Task
Search with bank : Bank of America and click on Go To Task then click on the bank account : BofA-2869
Click on the Edit button to add the new document, Click on the create  button
Enter the details and click on okName Value Payment Document XXAA_CHECK_FORMAT Format XXAA_CHECK_FORMAT (Created in Step2) Paper Stock Type Numbered Stock First Available Doc No 10000 Last Available Doc No 88888

Click on Save and Close button
d. Creating Payment Process Profile (PPP)
Enter the details and saveName Value Name XXAA_CHECK_FORMAT Code XXAA_CHECK_FORMAT Payment File Format XXAA_CHECK_FORMAT (Created in Step3) Processing Type Printed Enable Send to File
Note : Don’t select the payment document at this step
Click on Ok then select the Payment Document : XXAA_CHECK_FORMAT BofA-2869 and save
d. Creating PPR Template
Enter the below values save itName Value Template Name XXAA_CHECK_FORMAT Payment Method Check Disbursement Bank Account BofA-2869 Payment Document XXAA_CHECK_FORMAT (Created in Step2) Payment Process Profile XXAA_CHECK_FORMAT (Created in Step4) Payment Conversion Rate Corporate Review Proposed Payments Enable Create payment File Immediately Enable

Step 6. Enabling the Non-catalog link in Requisition page
Change Implementation Status to Implementations for
- Procurement Contracts
- Self Service Procurement
- Sourcing
- Supplier Portal
Save and close.
Mark the Parent 'Procurement' as implemented as well.
Save and Close this screen.
Step 7. Requisition Preferences Setup
Enter the Deliver-to Location as Seattle and click on Save and close button
Step 8. Approval Setups
Select the " Header Hierarchy" click on Edit Rules button
Create the Rules and add the conditions and click on Save and close button
Select the rule and click on enable button, Deploy the Rule
b. Purchase and Contract Purchase Agreement Approval
Is required to have at least one rule enabled, For instance "Terms Approval Serial", then create one action with approve results
Create the Rules and add the conditions and click on Save and close button
Select the rule and click on enable button, Deploy the rule
c. AP Invoice Approval Setups
Process Flow:
Navigate to the Purchasing Overview page and click the Create Agreement icon to launch the document creation flow. You could also select Create from the Actions menu.
The procurement business unit (BU) is responsible for administering and managing this contract purchase agreement. Select the BU and enter the below details and Click the Create button.Field Value Style Contract Purchase Agreement Procurement BU US1 Business Unit Supplier United Parcel Service Supplier Site UPS US1 Supplier Contact Gold, Bob Currency USD Buyer Oracle, Apps

A draft contract purchase agreement is created. The start and end dates are used to specify the period that the document is in effect and agreement amount can be used to both track and control release activity.Field Value Start Date 01/01/2017 End Date 12/31/2017 Agreement Amount 100 Minimum Release Amount 100 Payment Terms Immediate

Order Locally : The order locally checkbox enables a scenario where the requisitioning business unit outsources only the business processes related to negotiating and administering the agreement with the supplier, but still owns the business processes related to creating and administering its own purchase orders for commodities it is buying off the agreement.
Automatic Process: To allow orders to be automatically generated from requisitions sourced to this contract purchase agreement check the first control.
Notification Control : A notification control can remind you of agreements nearing expiration or to track and monitor release activity.
Click the Submit button.
The new agreement was submitted for approval.
We have the auto approval for below 10000 agreements so this agreement will be auto approved. Check the notifications
Click on the View Agreement to check the agreement details and Click on the attachment to check the agreement details
Once agreement is created status is in Open

Step 2: Create Requisition
Enter the details and click on Add to requisition buttonField Value Item Type Fixed Price Services Item Description PA:52223 - PR:203756 Category Name Miscellaneous Amount 100 Negotiated Enable Agreement 52223 (Supplier details will defaulted based on the agreement) Negotiated Enable (If the requisition line is sourced to a valid Contract Purchase Agreement then the 'Negotiated' flag should be checked on the requisition line) Charge Account 101.10.60540.121.000.000

Click on Edit and Submit button
Check the requisition details and click on Submit button
Requisition is submitted for approval
Requisition status is changed to Approved and Purchase order: 162902 is created.
Check the approval notification.
When the Requisition is approved purchase order will create automatically, Check the notifications
Step 3: Purchase Orders
When the Requisition is approved purchase order will create automatically, Search with Purchase order number: 162902
Click on the PO number
We have the auto approval for below 50k PO amount so we no need to send the po for approval, Once the PO approve PO status will be in Open status i.e Ready for invoice creation
Step 4. Create Payables invoice with Match PO Lines
Create an Invoice for supplier. This is the supplier which had received the PO : 162902
Enter the Invoice number and amount then click on the Match Invoice Lines button 
Field Value Number PO162902_INV Amount 109.50 Type Standard

Select the PO then Click on Apply and Ok button
PO information will populate in invoice line level, Click on Save button
Validate the invoice : Invoice Actions àValidate
Invoice is validated and initiates the invoice for approval
Workflow initiated
We have the invoice auto approval for below 10k and ORACLEAPPS88 user, Invoice will be auto approved. Check the notification
Check the invoice details

Enter the bank account details and click on submit
Payment is created and payment status is changed to Paid, Check the output file from Scheduled payments screen

Step 6: Receive the remaining goods or Close the Purchase Order
If we do not want to receive the remaining goods but instead we want to close the PO at this stage then we need to Close the PO line so that the remaining quantity is cancelled and the PO is closed.
Note:
Nav : Procurement à Purchasing àOrders àManage Orders
Click on the Actions and Close
Select the Finally Close and click on Ok
Now the PO status is changed to Finally Closed
Step 7. Transfer Payables data to General Ledger
Check the details and click on Done button
Accounting status is changed to Accounted and post to ledger
Go to Schedule Process and check the process details and click on output file
Click on the output file
Copy the batch name : Payables A 131394 1153685 N
Search with batch name in journals
Click on the Manage Journals
Search with Journal Name : Payables A 131394 1153685 N and click on journal name link
Journal is posted and status is completed
Step 8. Transfer Payments data to General Ledger
Search with payment document number or PPR name
Click on the document link
Post the payments, Actions àPost to Ledger
Click on View Accounting to verify the accounting details

Go to Schedule Process and check the process details and click on output file
Click on the output file
Copy the Batch Name : Payables A 131396 1153694 N
Search with batch name in journals
Click on the Manage Journals
Search with batch name : Payables A 131396 1153694 N and click on the payments journal

Step 9. Verify the Notifications in Mail
Source :oracleapps88 blog
The Procure To Pay cycle is vital to an organization as in this process the organization buys and received goods or services from its vendors and makes necessary payments.
The key functionalities for different processes of the Procure-to-Pay cycle are:
- In-built intelligence with business transactions--Role-based dashboards and work area for buyer, approver; presenting the statistical report, trend, spend analysis, personalized search capability
- Enhanced sourcing capabilities--Supplier analysis, visibility of supplier lead time and popularity across departments
- Supplier self-service-- Single log-on for suppliers providing complete visibility to their transactions and full invoicing capability
- Standardized processes -- to facilitate shared services model and centralized procurement function
- Smart Receipt capabilities-- Automatic receipt application engine, Over/Underpayment rules, Scored recommendations based on customer, transaction or exceptions, centralized approach for receipt processing, set up rules to match receipt to the specialist for manual intervention, and rules to mark the priority of the receipt based on attributes
- Payable dashboard--to collaborate with various participants, visibility of priority items and work volume, item tagging option for quick retrieval
- Invoice Work Area-- Invoice creation from scanned images, exception resolution, Invoice creation in a format based on real life physical invoice offering easy data entry and audit
- Integrated invoice image processing-- image attached with the invoice throughout invoice life-cycle
- Invoice indicators--Out of balance, status and hold, prepayment alert during entry
- Voucher matching -- with the receipt and PO in the same window
- Personalized view-- Excel-like capability to freeze columns, personalized search, full-screen view, export to excel
One of the best characteristics of the Oracle Fusion applications is that they can be fully integrated with traditional Oracle ERP solutions like PeopleSoft, Oracle EBS. So the existing Oracle customers can choose to implement module-wise and selective Fusion functions too.
With the in-built business intelligence capabilities and business benefits of cloud-based applications; Oracle Fusion financials and procurement definitely equip the finance and purchasing users to play a bigger role and add value in overall business achievements.
The P2P cycle comprises of the following steps,
Pre-requisite Setups:
1. Employee/User – Super Visor Setup
2. Buyer Setup
3. Supplier Setup
a. Supplier
b. Supplier Address
c. Supplier Sites
d. Supplier Contacts
4. Bank Account Setups
a. Banks
b. Branches
c. Bank Accounts
5. Payment Setups
a. Payment Templates
b. Payment Formats
c. Payment Document
d. Payment Process Profile (PPP)
e. Payment Process Request Template (Optional)
6. Enabling the Non-catalog link in Requisition page
7. Requisition Preferences Setup
8. Approval Setups
a. Requisition Approval
b. Purchase and Contract Purchase Agreement Approval
c. AP Invoice Approval
9. Items
Process Flow:
1. Contract Purchase Agreements
2. Requisitions
3. Purchase Orders
4. Create Payables invoice with Match PO Lines
5. Pay the invoice to Supplier with Check Payment Method
6. Receive the remaining goods or Close the Purchase Order
7. Transfer Payables data to General Ledger
8. Transfer Payments data to General Ledger
9. Verify the Notifications in Mail
Pre-requisite Setups:
Step 1. Employee/User – Super Visor Setup :
Click on the Manager Users link to create the User and Employee
Enter the employee information and select the Manger/Supervisor and click on Save and Close button
Step 2. Buyer Setup
Nav : Go to Functional Setup Manager (FSM) and search with “Manage Procurement Agents”
Click on the Actions and Create link
Enter the below values click on Save and Close button
Field | Value |
Procurement BU | US1 Business Unit |
Agent | Apps, Oracle |
Default Requisitioning BU | US1 Business Unit |
Manage Requisitions | Full |
Manage Purchase Order | Full |
Manage Purchase Agreements | Full |
Manage Negotiations | Full |
Step 3. Supplier Setup
Nav: Procurement à Suppliers àCreate Supplier
a. Supplier : 1258 – United Parcel Service
b. Supplier Addresses:
c. Supplier Sites :
d. Supplier Contact:
Step 4. Bank Account Setups :
a. Banks
b. Bank Branch
c. Bank Account
Step 5. Payment Setups
a. Creating Template
Create the template in Reports and Analytics
Click on Browse Catalog
Expand the Shared Folder then Expand the Custom folder then Financials then click on Payments and click on the edit link in Disbursement Payment file Format
Path : Shared Folder/Custom/Financials/Payments/Disbursement Payment file Format
Click on the Add new Layout link
Click on the upload layout link
Enter the Layout name and select the RTF file and save
Name | Value |
Layout Name | XXAA_CHECK_FORMAT |
Type | RTF Template |
Locale | English |
Set the custom layout as default and Select the output types as PDF and XML and click on Save.
b. Creating Payment Format
Go to Navigator and click on Setup and Maintenance
Search with Manage Formats and click on Go To Task
Select Disbursement Payment File Formats and click on Create
Enter the details and click on Save and Close
Name | Value |
Name | XXAA_CHECK_FORMAT |
Code | XXAA_CHECK_FORMAT |
BI Publisher Template | XXAA_CHECK_FORMAT (Created in Step1) |
c. Creating Payment Document
Go to Navigator and click on Setup and Maintenance
Search with Manage Bank Accounts and click on Go To Task
Search with bank : Bank of America and click on Go To Task then click on the bank account : BofA-2869
Click on the Edit button to add the new document, Click on the create button
 button
Enter the details and click on ok
Name | Value |
Payment Document | XXAA_CHECK_FORMAT |
Format | XXAA_CHECK_FORMAT (Created in Step2) |
Paper Stock Type | Numbered Stock |
First Available Doc No | 10000 |
Last Available Doc No | 88888 |
Click on Save and Close button
d. Creating Payment Process Profile (PPP)
Go to Navigator and click on Setup and Maintenance
Search with Manage Payment Process Profiles and click on Go To Task, Click on create button
buttonEnter the details and save
Name | Value |
Name | XXAA_CHECK_FORMAT |
Code | XXAA_CHECK_FORMAT |
Payment File Format | XXAA_CHECK_FORMAT (Created in Step3) |
Processing Type | Printed |
Enable | Send to File |
Note : Don’t select the payment document at this step
Note ID : Cannot Save New Payment Process Profile (Doc ID 1981556.1)
Click on Ok then select the Payment Document : XXAA_CHECK_FORMAT BofA-2869 and save
d. Creating PPR Template
Nav : Payables àPayments àTasks à Manage Payment Process Request Templates àActions àCreate
Enter the below values save it
Name | Value |
Template Name | XXAA_CHECK_FORMAT |
Payment Method | Check |
Disbursement Bank Account | BofA-2869 |
Payment Document | XXAA_CHECK_FORMAT (Created in Step2) |
Payment Process Profile | XXAA_CHECK_FORMAT (Created in Step4) |
Payment Conversion Rate | Corporate |
Review Proposed Payments | Enable |
Create payment File Immediately | Enable |
Step 6. Enabling the Non-catalog link in Requisition page
Nav : Functional Setup Manager Tasks Implementations Configure Offerings
Select Procurement and expand.
Change Implementation Status to Implementations for
- Procurement Contracts
- Self Service Procurement
- Sourcing
- Supplier Portal
Save and close.
Mark the Parent 'Procurement' as implemented as well.
Save and Close this screen.
Change Implementation Status to Implementations for
- Procurement Contracts
- Self Service Procurement
- Sourcing
- Supplier Portal
Save and close.
Mark the Parent 'Procurement' as implemented as well.
Save and Close this screen.
Step 7. Requisition Preferences Setup
For the first time it will ask you to enter the deliver to location details Click on the edit button
Enter the Deliver-to Location as Seattle and click on Save and close button
Step 8. Approval Setups
a. Requisition Approval Setup
Nav : Go to Functional Setup Manager (FSM) and search with “Manage Requisition Approvals”
Select the " Header Hierarchy" click on Edit Rules button
Create the Rules and add the conditions and click on Save and close button
Select the rule and click on enable button, Deploy the Rule
b. Purchase and Contract Purchase Agreement Approval
Nav : Go to Functional Setup Manager (FSM) and search with “Manage Purchasing Document Approvals”
Is required to have at least one rule enabled, For instance "Terms Approval Serial", then create one action with approve results
Select the "Terms Approval Serial" click on Edit Rules button
Create the Rules and add the conditions and click on Save and close button
Select the rule and click on enable button, Deploy the rule
c. AP Invoice Approval Setups
Enable the AP Invoice approval and click on Save and close button
Nav : Functional Setup Manager à Manage Invoice Options / Financials > Define Invoicing and Payments Configuration > Define Payables > Define General Payables Options > Manage Invoice Options
Process Flow:
Step 1: Contract Purchase Agreements
Nav: Procurement à Purchase àAgreement àCreate Agreement
Navigate to the Purchasing Overview page and click the Create Agreement icon to launch the document creation flow. You could also select Create from the Actions menu.
The procurement business unit (BU) is responsible for administering and managing this contract purchase agreement. Select the BU and enter the below details and Click the Create button.
Field | Value |
Style | Contract Purchase Agreement |
Procurement BU | US1 Business Unit |
Supplier | United Parcel Service |
Supplier Site | UPS US1 |
Supplier Contact | Gold, Bob |
Currency | USD |
Buyer | Oracle, Apps |
A draft contract purchase agreement is created. The start and end dates are used to specify the period that the document is in effect and agreement amount can be used to both track and control release activity.
Click on the Controls tab
Field | Value |
Start Date | 01/01/2017 |
End Date | 12/31/2017 |
Agreement Amount | 100 |
Minimum Release Amount | 100 |
Payment Terms | Immediate |
Order Locally : The order locally checkbox enables a scenario where the requisitioning business unit outsources only the business processes related to negotiating and administering the agreement with the supplier, but still owns the business processes related to creating and administering its own purchase orders for commodities it is buying off the agreement.
If unchecked, the client requisitioning business unit outsources all of these business processes.
You can use the order locally checkbox to configure what business processes the requisitioning business unit will outsource.
Automatic Process: To allow orders to be automatically generated from requisitions sourced to this contract purchase agreement check the first control.
The second control enables the orders automatically created to then be submitted for approval.
Check Automatically generate orders and Automatically submit for approval to enable automated buying.
Notification Control : A notification control can remind you of agreements nearing expiration or to track and monitor release activity.
Click the Submit button.
The new agreement was submitted for approval.
We have the auto approval for below 10000 agreements so this agreement will be auto approved. Check the notifications
Click on the View Agreement to check the agreement details and Click on the attachment to check the agreement details
Once agreement is created status is in Open
Step 2: Create Requisition
Create the purchase using the Contract Purchase Agreement number i.e. 52223
Nav: Procurement à Purchase Requisitions
Click on the Requisition Line Entry link
Enter the details and click on Add to requisition button
Field | Value |
Item Type | Fixed Price Services |
Item Description | PA:52223 - PR:203756 |
Category Name | Miscellaneous |
Amount | 100 |
Negotiated | Enable |
Agreement | 52223 (Supplier details will defaulted based on the agreement) |
Negotiated | Enable (If the requisition line is sourced to a valid Contract Purchase Agreement then the 'Negotiated' flag should be checked on the requisition line) |
Charge Account | 101.10.60540.121.000.000 |
Click on Edit and Submit button
Check the requisition details and click on Submit button
Requisition is submitted for approval
Requisition status is changed to Approved and Purchase order: 162902 is created.
We have the auto approval for below 50k requisition amount so this requisition will be auto approved and created the purchase order: 162902. Check the requisition status and it is approved
Check the approval notification.
When the Requisition is approved purchase order will create automatically, Check the notifications
Step 3: Purchase Orders
Nav: Procurement à Purchasing àOrders àManage Orders
When the Requisition is approved purchase order will create automatically, Search with Purchase order number: 162902
Click on the PO number
We have the auto approval for below 50k PO amount so we no need to send the po for approval, Once the PO approve PO status will be in Open status i.e Ready for invoice creation
Step 4. Create Payables invoice with Match PO Lines
Nav: Payables à Invoices àCreate Invoice
Create an Invoice for supplier. This is the supplier which had received the PO : 162902
Once select the PO then supplier information will be defaulted and enables the match invoice lines field
Enter the Invoice number and amount then click on the Match Invoice Lines button

Field | Value |
Number | PO162902_INV |
Amount | 109.50 |
Type | Standard |
Select the PO then Click on Apply and Ok button
PO information will populate in invoice line level, Click on Save button
Validate the invoice : Invoice Actions àValidate
Invoice is validated and initiates the invoice for approval
Workflow initiated
We have the invoice auto approval for below 10k and ORACLEAPPS88 user, Invoice will be auto approved. Check the notification
Check the invoice details
Step 5. Pay the invoice to Supplier with Check Payment Method
To make Online Payment from Invoice Actions, select ‘Pay in Full’ from Invoice Actions after invoice is validated.
Enter the bank account details and click on submit
Payment is created and payment status is changed to Paid, Check the output file from Scheduled payments screen
Step 6: Receive the remaining goods or Close the Purchase Order
Receive the remaining goods
For example if we select the some of goods like 10 and in that we did the transaction for only 5 goods
The supplier has been paid for the goods that have been received in the stores but we have received 5 goods out of the total number of 10. Therefore we have the option of receiving 5 more to complete the PO. If we receive the other 5 goods then we have to create another invoice to pay off those received goods.
If we do not want to receive the remaining goods but instead we want to close the PO at this stage then we need to Close the PO line so that the remaining quantity is cancelled and the PO is closed.
Note:
If we do not finish this step the PO will remain in open state and the amount will go into encumbrance, i.e. the open amount will be carried over to the next periods as the amount which will need to be paid to the supplier.
Nav : Procurement à Purchasing àOrders àManage Orders
PO status is changed to Closed for Invoicing
Click on the Actions and Close
Select the Finally Close and click on Ok
Now the PO status is changed to Finally Closed
Step 7. Transfer Payables data to General Ledger
Nav: Payables àInvoices àManage Invoices
Search with invoice and click on actions ->Post Ledger
Check the details and click on Done button
Accounting status is changed to Accounted and post to ledger
Go to Schedule Process and check the process details and click on output file
Click on the output file
Copy the batch name : Payables A 131394 1153685 N
Search with batch name in journals
Nav : General Accounting àJournals
Set the Ledger : US Primary Ledger
Click on the Manage Journals
Search with Journal Name : Payables A 131394 1153685 N and click on journal name link
Journal is posted and status is completed
Step 8. Transfer Payments data to General Ledger
Nav : Payables àPayments àManage Payments
Search with payment document number or PPR name
Click on the document link
Post the payments, Actions àPost to Ledger
Click on View Accounting to verify the accounting details
Go to Schedule Process and check the process details and click on output file
Click on the output file
Copy the Batch Name : Payables A 131396 1153694 N
Search with batch name in journals
Nav : General Accounting àJournals
Set the Ledger : US Primary Ledger
Click on the Manage Journals
Search with batch name : Payables A 131396 1153694 N and click on the payments journal
Step 9. Verify the Notifications in Mail
Source :oracleapps88 blog
